How to use Cloudflare CDN with cPanel hosting
There are plenty of benefits to using Cloudflare. The main benefit being an improved loading speed for your websites contents. This is due to the fact that when a visitor would visit your website without Cloudflare some of the content they view (especially images) may be hosted on the other side of the planet for them. Our server is hosted in France and if someone from Asia was to visit your website there would be a slight delay even if they had great internet speeds. Cloudflare changes this by caching some of your sites content on their servers around the globe so that if that Asian visitor came to your website with Cloudflare enabled the image would not be downloaded from our server in Europe, it would be downloaded from one of Cloudflares servers in Asia greatly increasing the data transfer.
Another main advantage is Cloudflare offers you even more protection from DDoS attacks, while all of our services do have DDoS protection there are plenty of different ways attackers can bring a website offline. Layer 7 attacks are something we can’t protect you from however Cloudflare does that and it’s all for free https://www.cloudflare.com/en-gb/learning/ddos/what-is-layer-7/
We advise all of our clients to take advantage of this great, free tool. There are some advantages to paid services Cloudflare offer such as their recently launched WordPress Optimizer – https://blog.cloudflare.com/automatic-platform-optimizations-starting-with-wordpress/
First things first, you will need a Cloudflare account. Either login or signup through https://dash.cloudflare.com/sign-up (Cloudflare offers free options which we will be using in this guide)
After you sign up you will be asked to enter your domain, do so and select the free option.
After that Cloudflare will begin it’s scan for current DNS records, it may take a few moments
If you are already using our Nameservers then Cloudflare should pull your current DNS settings (if it doesn’t we will cover how to change them below) be advised they won’t know all of your DNS records if you’ve set some unique named ones you will have to add them again, they just search for commonly used records and ping them.

Click Continue, Cloudflare should then ask you to change your nameservers
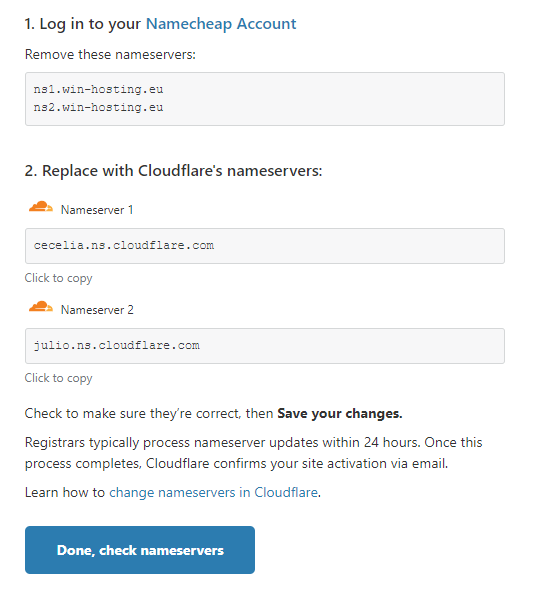
For our website it asked us to change them to cecelia & julio Cloudflare has lots of nameservers yours will probably be different.
After updating your nameservers click Done, check nameservers – You can keep the default optimize performance settings Cloudflare uses, changing minify may break your website.
That’s it you’re all done.
A very common issue with WordPress is “Too many redirects” if you get this issue try installing Cloudflare Flexible SSL plugin and inside Cloudflare SSL/TLS settings change to Flexible. However to do this you won’t have access so you will either need to 1) Change namesevers back or 2) Go into phpmyadmin > database > wplh_options and change https://yourdomain.com to http – You may also have to modify .htaccess to remove https redirect – After you’ve done that install the plugin and then enable https again through phpmyadmin + .htaccess
How to manually set the DNS records (if set incorrectly)
First you will need to log into our cPanel account and go to Zone Editor
Then next to your domain click Manage you will see a full list of your DNS records, like so
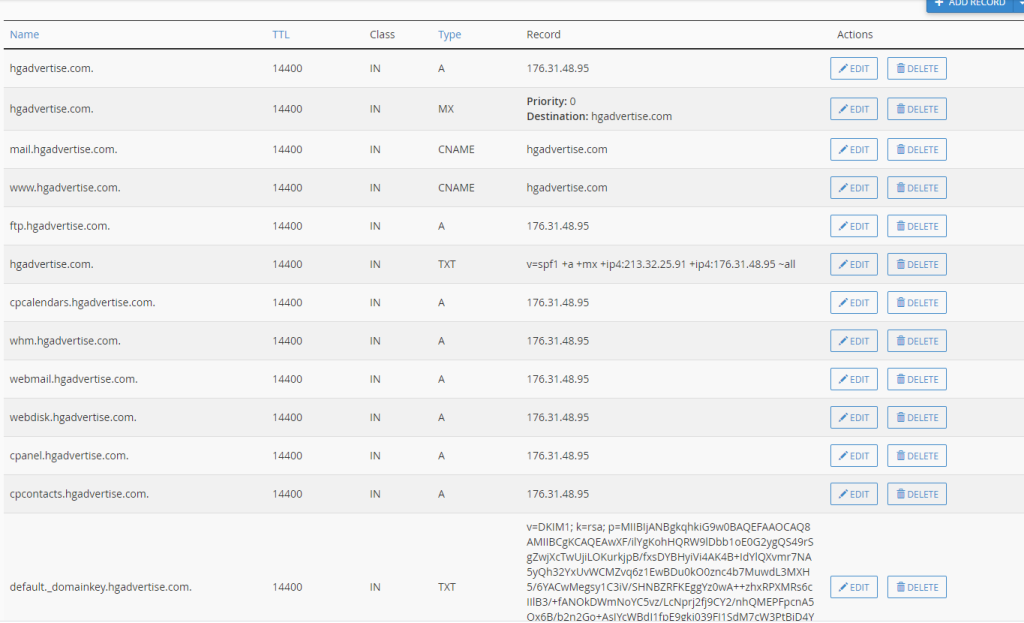
These are the records that you want to copy and paste into Cloudflare’s DNS settings so that you end up with something that looks like this

The most important two records on that list are (replace with your domain/IP)
A hgadvertise.com 176.31.48.95
CNAME www hgadvertise.com
This is the bear minimum that you need to get your website online through http://yourdomain.com and http://yourdomain.com . The other TXT records are for email purposes only to help sign your emails with a SFP/DKIM key to reduce the chances of hitting the spam box and the MX record is required to forward any emails to the cPanel server.